發表文章

目前顯示的是 2018的文章

Swift Sprite Kit add Tile Crash

#Swift Sprite Kit# ##Add Tile to sks crash## when you add image to Assets.xcassets then you go to your GameScene.sks add Tile Map Node every time XCODE crash. you can close your project first and goto your project folder only open your Map.sks and add image to sks file, when add completed save file and open project, then you can watch your map image and edit.

Swift Sprite Kit easy to create bullet

圖片
#Swift Sprite Kit# ##Easy create bullet## How to easy create bullet like picture 1. Create SkSpriteNode ``` var bullet = SKSpriteNode() ``` 2. Add SKSpriteNode to View ``` func bulletFire(){ bullet = SKSpriteNode(color: UIColor.green, size: CGSize(width: 5, height: 50)) bullet.name = "fireBullet" addChild(bullet) bullet.zPosition = 2 let move = SKAction.moveTo(y: self.frame.height, duration: 1) bullet.run(move) } ``` 3. Set remove Node after Node leave View ``` self.enumerateChildNodes(withName: "fireBullet") { (node : SKNode, nil) in if node.position.y > self.frame.height / 2 { node.removeFromParent() } } ``` 4. Add Node to TouchesBegin ``` override func touchesBegan(_ touches: Set , with event: UIEvent?) { for t in touches { self.touchDown(atPoint: t.location(in: self)) var pos : CGPoint = t.location(in: self) bulletFire() } } ```

Swift SpritKit : background image move

圖片
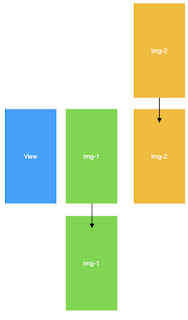
#Swift Spirte Kit# ##Background Image move# 如何連續移動背景圖,先看原理 先將 img-1 從 view 之中移動到 view 的下方直到看不到在移動回到 view 之中 再設定一組 img-2 從 view 的上面移動到 view 之中再回到 view 的上方 記住兩組的移動時間必須一至的 如何開始 宣告兩組變數 ``` var background = SKSpriteNode() var background02 = SKSpriteNode() ``` 設定第一組圖片 ``` background = SKSpriteNode(imageNamed: "image name") background.size = CGSize(width: self.size.width, height: self.size.height) background.position.y = self.size.height background.zPosition = -1 self.addChild(background) let move1 = SKAction.moveTo(y: self.frame.midY, duration: 30) let move2 = SKAction.moveTo(y: self.size.height, duration: 0) let seq = SKAction.sequence([move1,move2]) background.run(SKAction.repeatForever(seq)) ``` 設定第二組圖片 ``` background02 = SKSpriteNode(imageNamed: "country-platform-back") background02.size = CGSize(width: self.size.width, height: self.size.height) background02.zPosition = -1 background02.position.y = self.frame.midY //+ background02.size.height self

Swift Sprite Kit : SKShapeNode of circle

#Swift Sprite Kit# ##SKShapeNode of circle## I has create new circle on the Sprite Kit How to Create circle on Sprite Kit 1. Setup SKShapeNode ``` var newSprit = SKShapeNode() ``` 2. Create circle ``` newSprit = SKShapeNode(circleOfRadius: 25) self.addChild(newSprit) ``` 3. Setup Physicsbody ``` newSprit.physicsBody = SKPhysicsBody(circleOfRadius: 25) ``` Full Code : ``` var newSprit = SKShapeNode() func createNewSprite(point : CGPoint) { newSprit = SKShapeNode(circleOfRadius: 25) newSprit.strokeColor = UIColor.orange newSprit.fillColor = UIColor.orange newSprit.name = "TEST" newSprit.physicsBody = SKPhysicsBody(circleOfRadius: 25) self.addChild(newSprit) } ```

Switf Sprite remove NODE

#Swift Sprite Kit# ## Remove Node, if Node leave View## set ``` var newSprit = SKSpriteNode() ``` create function for Node create ``` func createNewSprite(point : CGPoint) { newSprit = SKSpriteNode(color: UIColor.orange, size: CGSize(width: 50, height: 50)) newSprit.physicsBody = SKPhysicsBody(rectangleOf: CGSize(width: 50, height: 50)) newSprit.position = point self.addChild(newSprit) } ``` on ```override func update(_ currentTime: TimeInterval)``` add new code ``` self.enumerateChildNodes(withName: String, using: (SKNode, UnsafeMutablePointer) -> Void) ``` check your View first, if your View setup by Portrait, you may check your node leave view by point X if your View setup by Landscape, you may check your node leave view by point y Code: ``` self.enumerateChildNodes(withName: "TEST") { (node : SKNode, nil) in if node.position.x < -320 || node.position.x > 320 { print("remove node")

PowerShell Create / Read json file

#PowerShell Create / Read json file# set format by [ordered] and out put to c:\test\jsonFile.json ``` $jsonFile = [ordered]@{ Title = "" BookName = "" BookNumber = "" } $jsonFile | ConvertTo-Json | Out-File C:\Test\jsonFile.json ``` read data from c:\test\jsonFile.json ``` $readJson = Get-Content C:\Test\jsonFile.json $readJson | ConvertFrom-Json $readJson.Title $readJson.BookName $readJson.BookNumber ```

PowerShell Create Windows Form

#PowerShell Create Windows Form# Create Form ``` $Form = New-Object system.Windows.Forms.Form ``` Set From Title ``` $Form.Text = "Test form" ``` Set Form Size ``` $Form.Width = 450 $Form.Height = 400 ``` Set show Form ``` $Form.ShowDialog() ``` Add Label to Form ``` $lineLabel = New-Object system.Windows.Forms.Label ``` set label text ``` $lineLabel.Text = "" ``` set label size ``` $lineLabel.Width = 380 $lineLabel.Height = 40 ``` Add Text box to Form ``` $Text = New-Object System.Windows.Forms.TextBox ``` set Text box multiline if ``` $$false ``` Textbox can not entry multiline ``` $Text.Multiline = $false ``` if ``` $true ``` Textbox can entry multiline ``` $Text.Multiline = $True ``` set Textbox size ``` $Text.Width = 200 $Text.Height = 20 ``` Add Textbox, Label to Form ``` $Form.Controls.AddRange(@($Text,$LineLabel)) ``` Full Code : ``` #Create form $Form = New-Object system.Windows.Forms.Form $Form.Text = "Test form" $Form.Width = 450 $Fo

XCOSE write / read data for user default

#XCOSE write / read data for user default# create userdefault standard ``` let userdefault = UserDefaults.standard ``` write data ``` userdefault.set(value: Any?, forKey: String) userdefault.set(value: Double, forKey: String) userdefault.set(value: Float, forKey: String) userdefault.set(value: Int, forKey: String) userdefault.set(url: URL?, forKey: String) ``` reading data ``` userdefault.object(forKey: String) ``` so if you save an data like this ``` userdefault.set(value: "Hello World!!", forKey: "key") ``` you need read data like this ``` userdefault.object(forKey: "key") ```

AdSense 並未順利啟用

圖片
#AdSense 並未順利啟用# 我想這是大家最頭痛的問題 大部分都是因為並沒有將你自己的網址加入 AdSense 檢索器 導致 AdSense 檢索器與 Google 檢索器不同。 這兩種檢索器會個別運作,但共用同一個快取。這可避免兩種檢索器同時要求相同網頁的情況,因此可以降低對發佈商頻寬造成的影響。同樣地,Search Console 檢索器也是獨立運作的 所以請記得前往 https://support.google.com/adsense/answer/17962 參閱

XCODE send XML request

#XCODE send XML request# create XML body ``` let xmlRequest = " \(accessToken) \(userID) \(userPW) " ``` create url for XML request ``` let url = URL(string: "url") var request = URLRequest(url: url!) request.httpMethod = "POST" request.addValue("application/XML", forHTTPHeaderField: "Content-Type") let httpBodys = xmlRequest.data(using: String.Encoding.utf8) request.httpBody = httpBodys let session = URLSession.shared session.dataTask(with: request) { (data, response, error) in if let response = response { print("response") print(response) } if let data = data { print("data") //print(data) } }.resume() ``` Full Code : ``` let xmlRequest = "XML body" let url = URL(string: "url") var request

Powershell transfer UPS Worldship address book process

#Transfer SQL DB to CSV# 1. Code can find code here https://dkswiftproject.blogspot.com/2018/10/powershell-transfert-ups-worldship.html , save as file Name : transfer-WorldshipSQLToUISAddressBook.ps1 2. Please check your Powershel version update to 5.1 3. Right click Mouse button and Run with PowerShell 4. Support Worldship SQL version :SQL2005, SQL2008, SQL2012, SQL2014 5. File default export to : UPS\WSTD\ImpExp, File Name : UISCSVEXPORT.csv

Powershell send request for XML POST

圖片
#Powershell send request for XML POST# on Powershell add line for you need request web address ``` $Uri = "request web address" ``` add line for for you need request XML body ``` $body = "xml form for request" ``` add line for create servce ``` [Net.ServicePointManager]::SecurityProtocol = [Net.SecurityProtocolType]::Tls12 ``` add line to set web request ``` $build_info = Invoke-WebRequest -uri $Uri -Method POST -Body $body -ContentType 'application/XML' #-Credential $usercreds ``` Full code : ``` $Uri = "request web address" $body = "xml form for request" [Net.ServicePointManager]::SecurityProtocol = [Net.SecurityProtocolType]::Tls12 $build_info = Invoke-WebRequest -uri $Uri -Method POST -Body $body -ContentType 'application/XML' #-Credential $usercreds $build_info.Content ```

PowerShell send file to FTP

圖片
#PowerShell send file to FTP# 如何使用 Powershell 傳送檔案至 FTP site Code: ``` $ftp = "ftp address" $user = "anonymous" $pass = "anonymous" $Dir = "C:\test" foreach($item in (dir $Dir "*.txt")){ $webclient = New-Object System.Net.WebClient $webclient.Credentials = New-Object System.Net.NetworkCredential($user,$pass) $uri = New-Object System.Uri($ftp+$item.Name) $webclient.UploadFile($uri, $item.FullName) } ```

Powershell Send mail by SMTP

圖片
#Powershell send mail by SMTP# 從網路上找到趕快把他記下來 如何使用 PowerShell send email ``` $daily = Get-Date -Format "yyyy/MM/dd" $From = "TestSender@test.com" $To = "test@test.com" $Cc = "AThirdUser@somewhere.com" $Attachment = "C:\users\Username\Documents\SomeTextFile.txt" $Subject = "Subject" $Body = "Please check attach files, file will remove $daily" $SMTPServer = "smtp server address" #$SMTPPort = "587" Send-MailMessage -From $From -To $To -Subject $Subject -Body $Body -SmtpServer $SMTPServer -Attachments ```

Raspberry to AirPlay

Raspberry Pi 變成我的 AirPlay 音響 需求: Raspberry Pi M/B x 1(美金 35 含運) D-link DWA-121 x 1(無線網卡) SD card 8G or 4G x1 USB speaker x 1 準備工作: 由於 RPi 的板子只支援 HDMI 輸出, AV 視訊輸出, 3.5mm 耳機孔音源輸出,以及兩個USB port , 當然最重要的還有 10/100 網路port 所以我們首先要有USB board and mouse , 然後要有 HDMI 轉DVI 的接頭方便我們將視訊部份輸出到電腦螢幕上。 再來我們要將官的 OS 裝到記憶卡上,不然空有板子沒有安裝 OS 也無法啟動的 檔案的部份從 Raspberry Pi 官方網站上下載,我下載時最新的版本為 “ 2012-12-16-wheezy-raspbian “ 利用 win32diskimager-binary 將OS 寫入到SD card 上 檔案寫入完畢後,要開始最重要的工作啦!開機 分別將 SD card 差入RPi 的SD card 卡槽,接上螢幕,鍵盤,以及你的無線網卡(DWA-121),插上電源後就會開機啦! 接下來就會進到初始畫面,統統跳過就會變到下面這樣啦(如果系統要求login ID 的話, 請輸入pi , 密碼: raspberry 再來就是慢長的key in 過程啦 pi@raspberrypi ~ $ sudo apt-get update pi@raspberrypi ~ $ sudo apt-get upgrade pi@raspberrypi ~ $ startx …………………進入 X window 去將 WIFI 連結起來 然後就可從遠端電腦透過 putty 連結過去做一些Config 啦 將預設輸出從 HDMI 改成 3.5mm 耳機輸出 pi@raspberrypi ~ $ sudo amixer cset numid=3 1 修改完後要做安裝 Shairport 的部份啦 pi@raspberrypi ~ $ sudo apt-get install git libao-dev libssl-dev libcrypt-ope

Powershell :: delete file by last modify date

圖片
之前有過一個需求是要能夠將分享的資料夾內的資料僅保留最近30天 其實很多方式都可以達到比如 Robocopy, PowerShell 這次選PowerShell 作為主要工具來刪除檔案 首先我們要取得資料夾內的所有檔案,判斷就用檔案的最後修改日期 ###Code:### ``` $paths = "C\TEST" Get-ChildItem -File -Recurse $paths | Where-object {$_.LastWriteTime -lt (get-date).adddays(-30) } | % { $_.FullName } ``` 這樣的話我們就已經可以知道所有超過30天以上的檔案是什麼了 如過要刪除檔案的話 就加上 Remove-Item (詳閱: https://docs.microsoft.com/en-us/powershell/module/microsoft.powershell.management/remove-item?view=powershell-6) ###Code :### ``` $paths = "C\TEST" Get-ChildItem -File -Recurse $paths | Where-object {$_.LastWriteTime -lt (get-date).adddays(-30) } | % { $_.FullName Remove-Item $_.FullName } ``` 想要再刪除檔案前先備份一下,就加上 Copy-Item(詳閱:https://docs.microsoft.com/en-us/powershell/module/microsoft.powershell.management/copy-item?view=powershell-6) 在 Remove-Item 之前 ###Code :### ``` Get-ChildItem -File -Recurse $paths | Where-object {$_.LastWriteTime -lt (get-date).adddays(-30) } | % { $_.FullName Copy-Item  $_.FullName "c:\Te

XCODE MacOS develop for create Alert

圖片
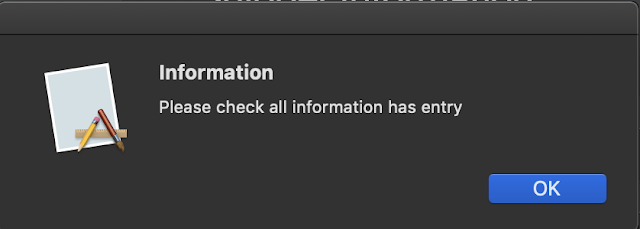
Code :  let alert = NSAlert ()  alert. messageText = "Information"  alert. informativeText = "Please check all information has entry"   alert. alertStyle = NSAlert . Style . warning   alert. addButton (withTitle: "OK" )   alert. runModal () run Code :

Powershell transfert UPS Worldship address book to csv file for UPS web import

PowerShell transfer UPS Worldship address book to csv file, for UPS Web shipping address book import. Code Release : ``` cls Set-ExecutionPolicy -ExecutionPolicy Bypass # database Intraction Write-Host "##################################################" -ForegroundColor Red Write-Host " Start Transfer Worldship Address Bokk data to UIS" -ForegroundColor Green Write-Host " " -ForegroundColor Red Write-Host "##################################################" -ForegroundColor Red Start-Sleep -Seconds 3 $Win64Arch = [Environment]::Is64BitProcess if($PSVersionTable.PSVersion -le 5.1){ write-host "Update Powershell first" exit } try{ if($Win64Arch -eq $true){ $temp = Get-ItemProperty -Path HKLM:SOFTWARE\WOW6432Node\UPS\Installation -ErrorAction Stop }else{ $temp = Get-ItemProperty -Path HKLM:SOFTWARE\UPS\Installation -ErrorAction Stop } }catch

Powershell 遠端執行

開啟 PowerShell 一定要用 Run As Administrator 去執行 從建立連線開始 $s = New-PSSession -ComputerName ' ComputerName ' 開始工作階段 Enter-PSSession -Session $s 在遠端執行 script Invoke-Command -ComputerName ' ComputerName ' { Get-Process } 離開連線 Exit-PSSession 詳情請參考: https://docs.microsoft.com/zh-tw/powershell/scripting/core-powershell/running-remote-commands?view=powershell-6